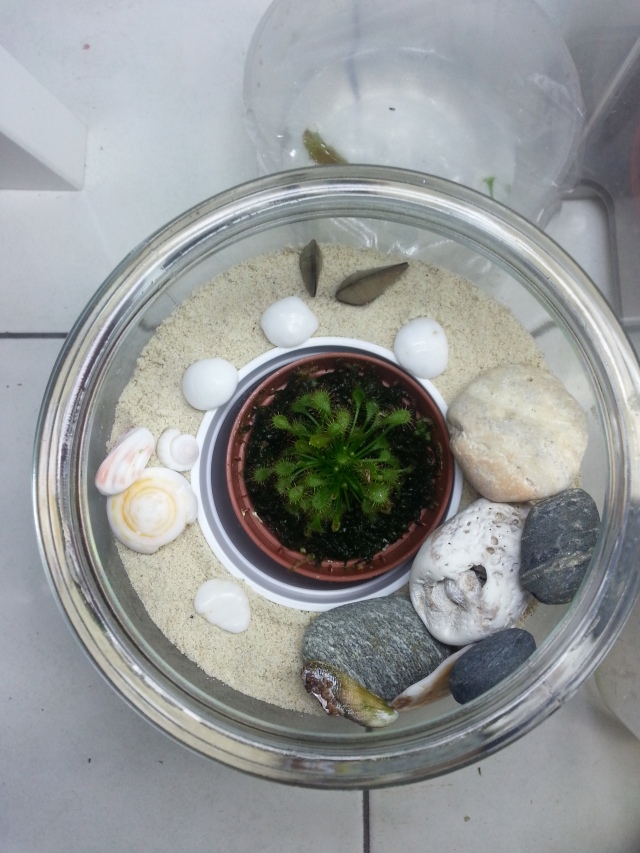
My Beach-Themed Terrarium

2013-06-20 20.59.38My Beach-Themed Terrarium

My little D.Intermedia has a new home!

I made this little terrarium after I returned from the beautiful beaches of Boracay with some of their sand and shells in tow. I loved the seaside town so much that I knew I had to incorporate some of it into my home.

D. Intermedia is a carnivorous plant that makes use of the sticky dew it produces to ensnare its prey. It loves humidity and water and is thus suitable for living in an enclosed space.

You will have noticed that I did not stick my plant directly into the sand. Carnivorous plants hate nutrient-rich soils and will quickly die if provided with nutrients. The sand and stones come from the ocean and are thus laden with them. I therefore put a plastic container slightly larger than the pot in there as the placement area. I can remove it to wash and refill with water as I need without worrying about tainting the water supply with undesired nutrients.

This took me only about 1 hour to make and it is my first attempt at terrarium building. I highly suggest everyone to rummage their kitchen cabinets for unused plastic/glass containers to make one themselves right now! It is such a relaxing and enjoyable pastime that beautifies the home.


Terrarium tip: Understand the plants you intend to stick into a terrarium before actually doing so. Otherwise you may end up killing your little treasure instead. 🙂

Posted in Uncategorized | Leave a comment

My crowning glory

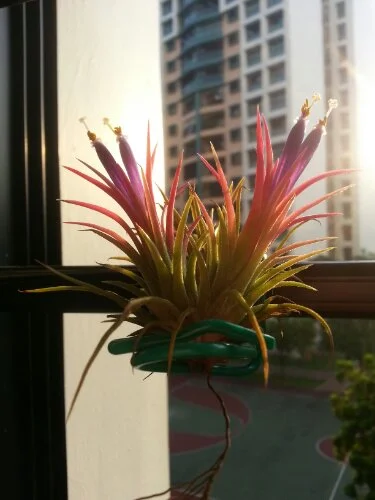
Is this gorgeous?

image

Tillandsias are one of the most fascinating plants in the world. Or well, in my opinion at least. They absorb everything they need through their leaves and their roots do nothing but anchor them.

They can be grown literally anywhere. Hanging from your window, sitting on wood/rocks/seashells, glued onto your mirrors, made into a door wreath… the list is only limited by your imagination.

Here is a pinterest I follow for some lovely tillandsia eye candy!


Posted in Gardening | Tagged | Leave a comment

Avocado says ‘Hi!’

image

Posted in Gardening | Leave a comment

I do so love the GCS forum

For the uninitiated, GCS stands for Green Culture Singapore. I stumbled upon the forum a few months ago while I, as a novice gardener, was desperately trying to green my fingers. Since then, I have been a ghost member of that forum, stalking every post that might serve to help me with my gardening adventures.

3 days ago, I made my first contact with a fellow gardener of the forum. I wanted some catnip seeds to grow in my little garden to ward off mozzies and fleas. And one of them happened to be giving them away! I got a message last night from the person saying that he had posted the seeds out and I should be receiving them soon! Joy 🙂

Today, I met up with yet another gardener to purchase my second ever CP (carnivorous plant). I’ve had a venus fly trap for ages now but it has been wilting dropping leaves off for months now. However, at the same time, there have been new much smaller traps growing and they look healthy green. It remains an unsolvable mystery to me.

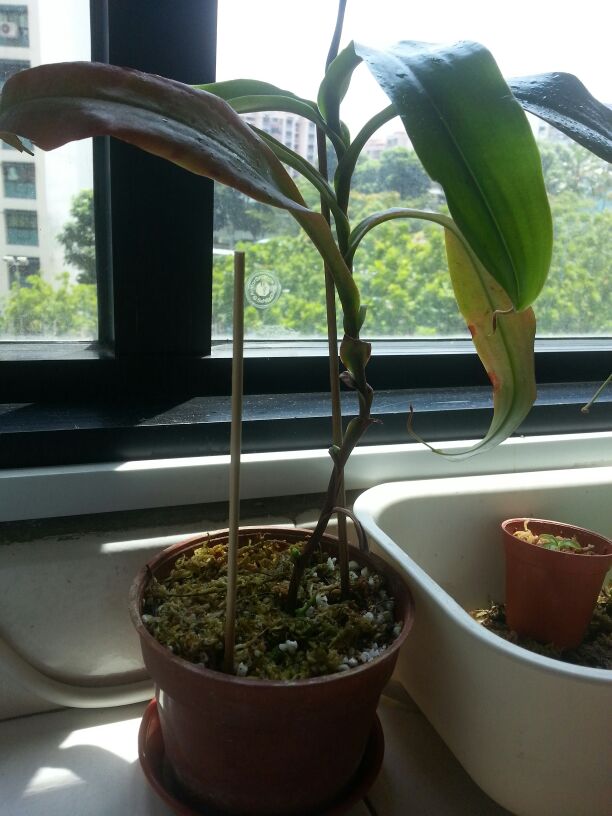
But back to my new purchase! It is a Nepenthes Mirabilis x Gracilis.

No pitchers as of yet but has 3 budding shoots

No pitchers as of yet but has 3 budding shoots

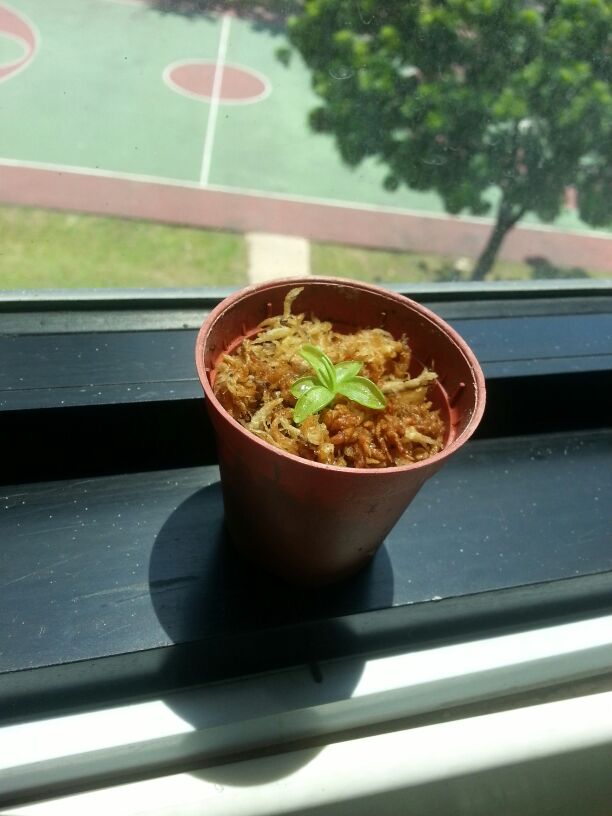
The seller was really sweet and offered me a FOC Pinguicula Primuliflora. It is one of the cutest CPs I’ve come across. The common name for it is Primrose Butterwort.

Here is a picture of mine 🙂

IMG-20130318-WA0002You can see that right in the middle of the plant, there is a thin stem growing up. I suspect it is the flower bud! Very excited to see what this will develop into! I will definitely be posting more updates on this cutie pie.

Posted in Gardening | Leave a comment

Please welcome my latest edition!

My newest buddy

My newest buddy

Aloe, aloe.. where do I begin?

Beauty. Check.

Usefulness. Check.

Low maintenance. Check.

This plant simply sells itself. Aloe vera is popular all over the world because everyone knows just how darn good it is. We have it in drinks, in medicine, in food and in skin care products. If any plant has taken over the world, it would be this.

Aloe vera doesn’t demand much in terms of care. You can leave it alone in indirect sun and forget to water it for a few weeks and it would still be cheerfully growing. In fact, you should leave it alone. It is amazingly easy to overwater an Aloe plant. As a succulent, they store up plenty of water on their own. Where else would you get the awesome juice from?

I’m simply loving my newest addition to the family. I bought a small and relatively young plant because I want to enjoy watching it grow from scratch. I think there is little else that provides the satisfaction of rearing up a young, be it plant or animal.

In other new, my garden just got a make over!

I’m absolutely loving my new plant stand! It simple and gorgeous. Not to mention functional! Sitting on that plant stand is the trench where I released my worms.

They are doing perfectly fine if you were wondering. Not to sure if they have managed to reproduce though. Thus far, I only managed to glimpse one of them as I worked the soil. It looked pretty fat and happy.

My aquarium also got a nice upgrade. The smaller tank now holds baby guppies while the big one has lovely fauna and 4 good sized adult guppies. My caveman aquaponics system has successful churned out a good sized peppermint! I’ve been busy cutting it back down due to it’s explosive growth.

On the right hand side, the big box on the floor with cardboard all over it is my worm bin.  I’ve recently increased their home and boy oh boy are they delighted. The reason for me upgrading the size is because I realized that they simply weren’t surfacing or reproducing fast enough. Worms regulate their own population according to the space and food they have. So once the population growth slowed down, I knew it was time to give them a bigger playground.

No, it does not have drainage holes, yes it does have airholes. I know some people would go, “But hey! You could very well drown your worms!” In response, I would like to say that in my smaller bin (the bin above the orange container) I never faced any problems with swamping or The Worm Crawl. I never watered my worms after the Mites Fiasco and the bin had always remained sufficiently damp from the food that goes in. I regularly add paper and cardboard and it has absorbed any excess moisture just fine. I’m confident it will work for the upgraded bin as well.

Now to tally up, I’m currently growing: lemon balm; chives; pandan; chilli; bell pepper; peppermint; spearmint; apple mint; sweet potato; bitter gourd; egg plant; baby blue eyes; tomatoes; lettuce; green beans; avocado; curry plant.

Whew.. quite a list for such a small space eh. No wonder I’ve yet to eat anything I’ve grown, there simply isn’t enough place to produce food for even a person. Doubt I’ll be feeding myself anytime soon ha!

Posted in Gardening | Leave a comment

Exciting discovery!

As you know, I have been vermicomposting for about 2 months now. When I did my set up, I used two boxes so that I could experiment around a little more and of course, have a backup.

Today, while tending my smaller box which only has 2 worms, I found a cocoon!

Image

Cocoons are every vermicomposter’s dream come true. It signifies that your bin is in a good condition and that your worms are super duper happy living in it. By next week, that particular bin will have more than doubled in population. Each cocoon contains 5-9 baby worms. Assuming that it only has 5 worms, I can expect to see 7 crawlies around this time next week 🙂

 Image

My bigger bin might or might not have had cocoons. It’s size makes it difficult to spot any. However, I did see thin and small worms around so, who knows? They might have had popped quite a few and I had no clue!

Given that I have had success with just 2 worms in a bin, I decided to experiment further. While researching, I came across this recommendation to dig a hole in the garden, line it with bedding and set your worms in it. That way, whatever castings your worms make goes straight into the soil. I thought it was a pretty cool idea and decided to give it a go.

Image

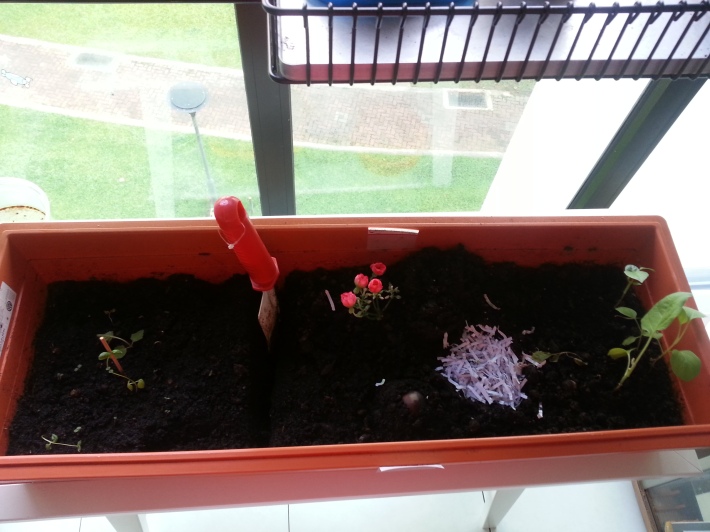
As you can see, I have a little trench type flower bin and I’ve been growing some mint and lemon balm seeds on the left. I tried rooting the mints but they don’t seem to be doing well from being rooted straight into soil. There is an avocado seed on the left of my newly designated spot for the worms and on the other side, I’ve been growing some egg plants and capsicums but they haven’t been going very well. It has been about 4 months since I started them I believe. Perhaps it is the soil quality…

So anyhoo! I understand that avocados are heavy feeders and for good fruit, you need good soil! If things go well for my worm hole, I should have good quality soil in no time.

I’ll keep this space posted on the hole in the ground. If my worms do the worm crawl, I’ll know that this ain’t a good idea and warn you guys about it!

Posted in Gardening, Vermiculture | Tagged , , , , , , , , | Leave a comment

Chocolate Banana Bar

I deliberated a long time before coming up with a suitable title for this particular snack bar. It has got so many super goodies inside that I just can’t decide on which ones to focus on. In the end, I went with the crowd pleasers. I don’t know many people who would not like a chocolate-banana combination!

This snack bar is soft, sweet and eager to please, not so different from a little puppy. Packed to the brim with vitamins and minerals, this bar will easily fulfill your daily dietary requirements for fruits with a single munch.

With almonds, banana and dried fruit on the outside and chocolate, peanut butter and avocado on the inside, your taste buds are in for a mega treat. Each bite is like a party in your mouth.

Ingredients

  • 2 large bananas, mashed separately
  • 6 heaping tbsp of grounded almonds
  • 1 small avocado, mashed
  • 3 tbsp peanut butter ( I make my own )
  • 1 tbsp dried fruits (apricot and cranberries)
  • 3 tbsp cocoa powder (adjust to the sizes of your avocado and banana as necessary)
  • pinch of salt

Directions

Filling

  • Combine peanut butter, 1 mashed banana, 1 mashed avocado and cocoa powder together. Feel free to use a food processor or a small blender to help you along.
  • Add a pinch of salt to taste
  • Place the mixture into a rectangle container or baking tin lined with non-stick parchment. Freeze for 2-3 hours.

Coating

  • Mash the remaining banana and combine with some ground almonds.
  • Dice the dried fruit into small pieces and stir into the banana mixture. Then pour this into a wide and shallow bowl to better help with the next step
  • Divide the doughy mixture into 6-7 portions and flatten them out
  • Bring out your frozen chocolate filling and cut them into rectangles
  • Place the rectangles on top of the flattened mixture and gently wrap them up
  • Transfer your bars carefully onto a baking sheet and bake them for 20 minutes at 180 degrees celsius (400 F)
  • Cool in the fridge overnight and enjoy!

Note: If you find that it is too soft and not enough of a bar-like texture, replace almonds with oats (I like to process them into powder before baking, but you can use it straight if you like). Straight after baking, cool it on a rack and you can serve after 20 minutes. It will be chewy and have a better bar texture.

Posted in Food, Healthy chomps | Leave a comment

Speedy update from my phone :)

image

A quick update on my planting adventures! Last month I posted on the many benefits of the magic that is lemon balm.

I had tried rooting the cutting I took but sadly, before the roots could grow,  a devilish wind puffed my little plant from my window sill to god-knows-where. I got impatient and went to purchase some seeds to start. The little pot above was planted on the 4th of January and look how well it has grown!

image

I do so love the mint family. They grow without much help. The best thing about growing lemon balm is that unlike its regular mint cousin, it does not require heavy watering. In fact, it is drought-resistant! That means you can get away with neglecting this baby.

But of course, you don’t really want to deprieve your plant of water when you are after its oils!

Posted in Gardening | Tagged , , , | Leave a comment

Worm composting problems

My worms have not had a good time with me. I’m glad I started out small with just 250g of them. Any larger, the vermiculture police might just arrest me for the crimes I’ve been committing against my crawlies.

In my previous post on vermiculture, I’ve mentioned that I’ve found maggots in my bin. At that time, it was a minor issue. Only had about 10 of them crawling around. All of which, once caught, promptly became fish food. For a couple of days, everything was fine and dandy. Until I put in bread and lettuce.

The very next day, I got a shock of my life when I opened up my bin. Right at a corner where the lettuce lay, was an explosive maggot population. At the other corner, the bread was swarming with white mites.

As for my worms? They were all the way in yet another corner hiding. I guess they don’t like their new neighbours any more than I do. I soon discovered why.

While maggots and mites are supposed to be friends of the worms, in vast populations, they can become dangerous. This was underscored for me when I found a poor worm dead with what must be about 100 maggots crawling all over it.

Bleh, I’ve got gooseflesh just recalling that scene.

I quickly pulled out my worms with a pair of chopsticks and dumped them into a new bin with fresh bedding and disposed of the old bin. I don’t care how beneficial these fellow bugs are supposed to be. I just can’t tolerate that many of them in my home.

It’s been about a week since I restarted my bin and sadly, I found maggots and mites once again. They are not in huge numbers as they previously were but I’m highly wary of them now. A quick search on the Internet revealed my problem.

Mites and maggots thrive in wet and acidic areas. I’ve been putting in more food than my worms can handle and the bin is far too wet. The simplest solution to this problem is to add more dry bedding. Having a nice thick layer of paper would prevent the flies that emerge from the maggots from flying around and laying more eggs. Trapped, they would eventually die off and become worm food. As for the mites, they are a common problem with putting bread into a wet bin. So once the dry paper has soaked up the excess water, they will eventually die off as well.

I’m hoping that ‘eventually’ would come really soon. These icky bugs are driving me nuts!

Posted in Vermiculture | Tagged , , , , , , , , | Leave a comment

BanaNut

I’m finally back after a long hiatus! Man, I just can’t get used to life without a domestic helper. When you have to do the housework all by yourself, it seems like work never ends! On top of that, I have two constantly pooping dogs to clean up after. All I can say is, I’m just glad my domestic helper is back. Having her around really frees up my time!

The recipe I’m going to share with you today is really simple and filling! It is a good snack to carry around and keeps you happy and full till your next meal. Say goodbye to all the crap snacks that provides empty calories only!

2013-02-04 15.29.01

You will need:

  1. 1 big banana or 2 medium sized bananas – mashed
  2. 1/4 cup shredded coconut
  3. 1/4 cup honey
  4. 1/4 cup tofu
  5. 1/4 – 1/2 cup whole meal flour/ all-purpose flour (depends on how healthy you want to be or how tolerant you are of a cardboard-y texture)
  6. 1/2 tsp vanilla extract
  7. 1/2 tsp baileys
  8. 1/2 tsp salt
  9. 1/4 tsp baking powder

Directions

  1. Preheat oven to 350F or 180 degrees Celsius.
  2. Combine banana, tofu, coconut and honey together and mash them up well. You want them really well incorporated. I suggest blending the mixture together.

    Banana, Coconut, Honey mixture

  3. Add vanilla extract, baileys, salt and baking powder into the mixture.

    2013-01-31 13.57.44

  4. Finally, fold in the flour.
  5. Line your tin with baking paper and bake for 20 minutes. Leave it in the oven to firm up for another 10 minutes.
  6. Finally, slice and serve! Or wrap it in seran wrap and bring it work/school as a healthy snack 🙂

    BanaNut Bar

Posted in Food, Healthy chomps | Tagged , , , , , , , , , , | Leave a comment